Advanced manoeuvres
Turning at low level in the poor visibility configuration is slightly different from turning in the cruise at altitude. When turning during the cruise at altitude, a reduction in airspeed or some altitude loss is not necessarily dangerous. However, at low level, low airspeed, and in the poor visibility configuration, it's vital to maintain altitude and airspeed.
The reasons for practising turning at low level is to improve confidence and flying accuracy, as well as to prepare against the possible need of operating in deteriorating weather.
To compensate for the effects of inertia, visual illusions, and stress when operating the aeroplane in close proximity to the ground.
To carry out various level turns in the poor visibility configuration.
The observation of ground features is changed from a plan view to more of a profile view. This can make map reading and navigation more difficult due to a reduced radius of visible features, and in hilly terrain may obscure the true horizon. In this situation, the horizon will need to be estimated and more frequent cross-reference to instruments made to confirm performance.
During flight at low level, height above ground is estimated visually, and the altimeter is used as a secondary reference.
A dangerous visual illusion may occur when flying over gently rising terrain. As the ground gradually slopes upwards, there is a tendency to align the aeroplane with the slope so that the impression of level flight is maintained. If the airspeed indicator and altimeter are not cross-referenced regularly, the aeroplane may eventually be brought to the stall. This situation can be particularly dangerous if only the reduction in airspeed is observed. In an attempt to compensate for the decreasing airspeed, the pilot increases the power, until a turn away from rising terrain is forced on the pilot at low airspeed and full power – usually resulting in a stall in the turn.
Terrain rises steeply in New Zealand, with the gradient of a significant proportion exceeding the climb performance of the average training aeroplane.
Avoid flying in the lee of hills or ridge tops where turbulence and downdraughts are most pronounced.
As will be discussed in Terrain and weather awareness and in Basic mountain flying, avoid the centre of a valley because, if a decision to turn back is made, regardless of which way the turn is executed, the maximum turning space will not be available.
When in a valley, fly according to right-of-way rules, ie, right side of the valley, unless attitude and altitude are challenged. Then fly on the upwind side of hilly terrain, or updraught side of valleys, where relatively smooth updraughts can be expected. If a turn back is required, the full width of the valley is available for turning, minimising the turn radius.
Power lines should always be crossed at the pylons. The pylons are easier to see, and there can be no wires above the pylons or the aeroplane. Many high-tension power lines have a very thin earthing wire stretched between the pylons, well above the main cables. It's very difficult to see these.
Ridges should always be crossed at an oblique angle. This method requires less bank angle if a turn away from rapidly rising terrain or downdraughts is required.
Crossing ridges and passes is covered in more depth in the Terrain and weather awareness lesson, and further in the Basic mountain flying lesson.
The boundaries of the low flying zone and the minimum permissible height are revised.
Solo flights must be specifically and individually authorised immediately before the intended flight.
Some organisations do not permit solo low flying practice at all (refer CFI).
Revise flight over water if applicable.
Make a careful inspection of the low flying zone, and prepare the aeroplane before entering the area (HASELLL).
A broadcast or report, including the estimated elapsed time to be spent in the area, must be made on entering the low flying zone. A vacating report must be made when leaving.
Restate the poor visibility configuration for your aeroplane. Re-emphasise that good management of the whole flight should negate the need for using the poor visibility configuration.
Prolonged use of the poor visibility configuration may affect flight planning (fuel reserves or daylight) and engine operating temperatures. Use SADIE more frequently.
Be aware of the visual illusions created by drift, and maintain a regular crosscheck of instruments, especially the balance indicator.
When entering a medium turn in normal cruise, the angle of attack is increased by increasing backpressure to maintain height, and the reduction in airspeed is ignored, for example, 90 knots reduces to 87 knots.
When turning, even at medium angles of bank, in the poor visibility configuration, no reduction in airspeed is acceptable. Therefore, in order to maintain the nominated configuration speed, increase the power.
The required power increase for a medium turn is generally quite small.
Steep turns in the poor visibility configuration are generally restricted to a maximum of 45 degrees angle of bank. There are two reasons for this.
Firstly, as covered in the Steep turns lesson, the increase in drag and the stalling speed are not proportional to angle of bank but are exponential. Therefore, as the angle of bank increases beyond 45 degrees, both the stalling speed and drag rapidly increase.
With the aeroplane already operating at a low airspeed, there is little margin for an increase in the stalling speed. In addition, the amount of power required to maintain altitude at angles of bank greater than 45 degrees may not be available as a result of the rapidly increasing drag.
The second reason involves the aeroplane's structural limits. Most aeroplanes have a reduced maximum G-load limit when flap is extended. For example, the PA38 is limited to +2.0G when flap is extended, and this G loading is reached at an angle of bank of 60 degrees.
When entering the steep turn from normal cruise, backpressure is increased to maintain altitude and, although the increase in drag is not ignored beyond 30 degrees angle of bank, some decrease in airspeed as a result of the substantially increased drag is expected and acceptable.
When entering the steep turn at low level in the poor visibility configuration, however, absolutely no decrease in airspeed is acceptable, because of the small margin over the stalling speed.
To maintain this margin over the stall speed, power is increased on entry – the power increase required may be substantial, although not necessarily full power.
During the turn, attitude, angle of bank, speed, and balance are monitored.
If altitude is being lost, reduce the angle of bank, increase power if necessary. If full power has been applied and altitude is still being lost, there is only one option available – further decrease the angle of bank – quickly!
On exiting the turn, power is reduced in anticipation during the rollout, keeping the airspeed constant.
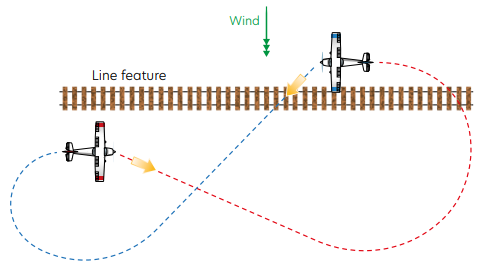
This is a 180-degree turn to avoid an obstacle or poor weather ahead. The direction of the turn is dictated by the wind, but in nil wind conditions turn left or right to maximise visibility.
It's common practice during basic training to simulate the worst case scenario. Therefore, this exercise assumes a line feature is being followed (road, river, or railway line) in conditions of poor visibility and an obstacle appears ahead, or a decision to turn back is made (see Figure 1). A turn 45 degrees off the line feature downwind is made to allow sufficient space to turn back into wind, to cross the line feature and return with the feature on the left is recommended (an allowance for drift may be required).

Figure 1 Reversal turn
It's important to maintain visual contact with the line feature throughout the manoeuvre.
Note, however, that an earlier decision to turn back, probably in conditions of better visibility, may have required only a medium turn.

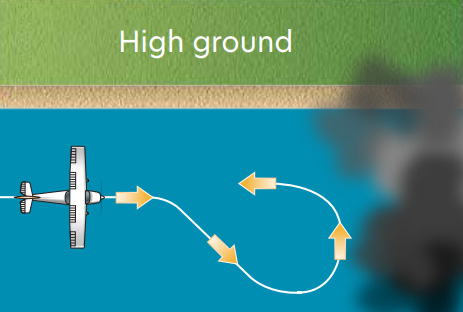
Figure 2 Coastal reversal turn
Once again the worst case scenario is simulated. An obstruction ahead or weather requires a turn back when the feature being followed is the coastline. Simulated poor visibility means no definable horizon is available seaward, and the coastal terrain is simulated as being higher than the aeroplane (see Figure 2).
The aim of this manoeuvre is to keep the reference (the coast) in sight throughout the turn to seaward and then track back along the coast in the opposite direction.
This procedure should not be confused with an instrument procedural turn. The coastal reversal turn is a totally visual procedure, with cross-reference to instruments being only for accurate flight. Throughout the procedure, the reference (the coast) must be kept in sight.
The wind direction and strength will determine which heading is chosen to track away from the coast to provide enough space to complete the reversal turn.
With the wind parallel to the coast (head or tailwind), a turn away from the coast of about 45 degrees is recommended. This may be backed up by a DI heading or simply estimated. Keep the coast reference in sight and track out far enough to ensure sufficient space to complete the turn.
If the wind is offshore, and depending on wind strength, tracking out at a lesser angle and/or a shorter time is used to remain closer to the coast while still ensuring sufficient space to complete the turn.
If the wind is onshore, tracking out at a larger angle is not generally recommended because of the difficulty in keeping the reference in sight. However, if the coastal terrain so dictates, there will be no choice. This is a good reason to turn back well before the situation deteriorates to this degree.
The angle of bank used in the initial turn away from the coast will be influenced by the pilot's ability to keep the reference in sight. If the coastline is on the left-hand side, a larger angle of bank can be used than if the coastline is on the right-hand side.
When the distance out has been assessed as enough, the turn is reversed, turning toward the reference (coast) to keep it in sight.
In this reversal, a steep turn should be entered, and as soon as it's obvious that the turn can be completed within the space available, the angle of bank can be reduced.
Starting the reversal with a medium turn is not recommended. If it becomes obvious that a steeper angle of bank will be required, this may not be possible while maintaining altitude.
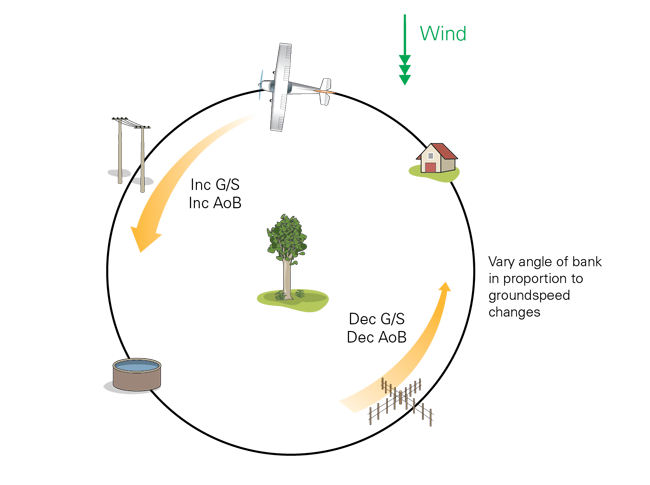
The aim of a constant radius turn is to counteract the effects of drift while turning in order to maintain a constant distance from a ground reference.

Figure 3 Constant radius turn
It's simplest to identify four points equidistant from the feature/reference point to scribe a circle around (see Figure 3). Maintain a constant radius by overflying each of the four points on the circle, applying the principle; increasing groundspeed, increase angle of bank, decreasing groundspeed, decrease angle of bank. This will account for the drift.
The medium turns can be practised by the student, and depending on the student, they may be able to practise steep turns without a demonstration from you.
Demonstrate the obstacle avoidance or line feature reversal turn, and then the student should practise.
Taking into account the wind direction and strength, discuss the manoeuvre with the student before you demonstrate the turn in both directions. The student can then practise as you talk them through, followed by their own practice.
Repeat for coastal reversal turn scenario.
Demonstrate the first constant radius turn and from then on the student should be able to practise this with coaching from you.
The next lesson will be using the newly acquired low flying skills and should be Precautionary landing.
Low flying consolidation whiteboard layout [PDF 539 KB]
Revised 2023