Basic concepts
A medium turn is defined as a turn using up to 30 degrees angle of bank. Climbing and descending turns are combined with medium turns within this briefing, but your organisation may prefer to present a separate briefing; consult with your CFI.
The turning lesson builds on the previous lessons. The student will improve their attitude control and learn to smoothly and accurately coordinate aileron and rudder. During the roll-out the student will need to allow for aeroplane inertia and use smooth control inputs to regain the original reference point and height.
During this lesson the student will have the opportunity to practise straight and level, climbing, and descending. This is the stage at which the lookout technique is taught specifically, with the emphasis on the 20 degree per 2 second visual scan technique.
Define the medium turn and explain angle of bank. Explain that if you wanted to change direction, you wouldn’t normally complete an entire circle. However, in order to reduce the chance of disorientation we complete a 360 degree turn and regain straight and level on the original reference point.
To change direction through 360 degrees at a constant rate, using 30 degrees angle of bank, while maintaining a constant altitude and keeping the aeroplane in balance.
To complete a medium turn while climbing and while descending.
Start with a diagram of the aeroplane flying into the board (so that the student is correctly orientated) and revise how lift equals weight in straight and level flight (see Figure 1a).
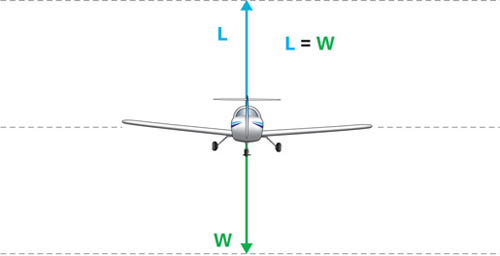
Figure 1a Straight and level flight
It is very important that the student understands that in order to turn the aeroplane an acceleration towards the centre of the turn must be provided. This is done by banking the aeroplane with aileron. Breaking lift down into its two components shows that it is the horizontal component of lift (centripetal force) that provides this acceleration towards the centre of the turn.
With the lift vector inclined, the vertical component of lift no longer supports the aeroplane’s weight. To maintain a constant altitude or height, the total lift vector must be increased so that the vertical component now equals the weight. The appropriate amount of backpressure on the control column achieves this (see Figure 1b).
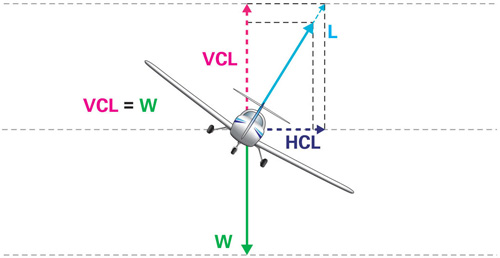
Figure 1b Banking to the right
Of the options available for increasing lift, changing the angle of attack is the most practical. Any increase in lift will produce a corresponding increase in drag, and therefore, a reduction in airspeed. In the medium level turn, the lift and drag increases are very slight and the decrease in airspeed is minor – only subtle elevator application may be necessary.
From the Effects of controls lesson, the student knows that ailerons are used to bank an aeroplane, and this is achieved by changing the shape (camber) of the wing, which in turn changes the lift on that wing. In order to bank right, for example, the left (or up-going) wing has more lift and the right (or down going) wing has less lift.
One of the side-effects of increasing lift is a corresponding increase in drag. So even though there is more lift on the up-going wing, and the aeroplane rolls, there is also more drag on that wing, and that produces a yaw, away from the direction of the turn – termed adverse yaw (see Figure 2).
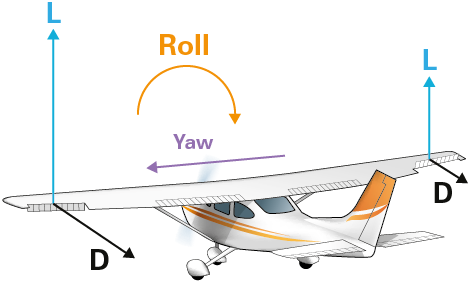
Figure 2 Yaw away from the direction of the turn
To overcome this effect and to achieve balanced flight, rudder pressure is applied in the direction of turn, while the ailerons are being moved. Once the required bank angle is achieved, and the ailerons centralised, the rudder pressure can be reduced to maintain balance.
The amount of rudder required to overcome adverse yaw is dependent on the rate of roll. For example, during a rapid roll more rudder will be needed than at lower rates. The benefits of differential and Frise ailerons may be discussed.
During descending turns, while at low airspeeds, the ailerons will need to be deflected further to achieve the same roll rate as at higher airspeeds. The increased deflection increases the drag, and requires more rudder to overcome the adverse yaw.
Overbanking is the tendency of an aeroplane to want to continue the roll into the turn, or increase the bank angle of its own accord.
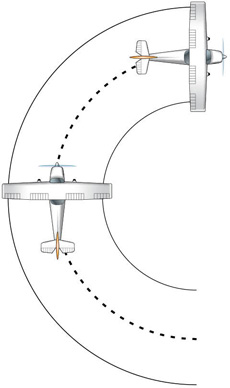
Figure 3 Aeroplane wants to continue the roll
In a level turn, the outside wingtip travels further, and therefore faster, than the inside wingtip (see Figure 3). This increase in airspeed results in an increase in lift, which produces a tendency to roll into the turn. Even though this effect is minimal in small training aeroplanes, there will be a tendency for the aeroplane to increase its angle of bank if uncorrected.
For the purpose of this briefing, the increased tendency to overbank in both medium level turns and in climbing turns is caused by the outer wing travelling faster than the inner wing, thereby producing more lift and causing the aeroplane to increase the bank angle. Emphasis must be placed on negating these tendencies by maintaining the required angle of bank with aileron, commonly referred to as holding off bank.
In descending turns, the inner wing travels down a steeper descent path and hence meets the relative airflow at a greater angle of attack than the outer wing. The effect is to reduce, neutralise or even reverse the tendency for the bank to increase.
This can be expanded on in a separate briefing if needed.
As covered in the Climbing and descending lesson, excess power determines the rate of climb. When a turn is combined with the climb, the tilting of the lift force and the increase in drag decreases the excess power, and reduces the rate of climb. Therefore, where a requirement to turn and climb exists, and performance is consequently reduced, the angle of bank is commonly limited to 20 degrees, with 15 degrees used for this exercise.
There are no significantly detrimental effects on performance when descending at angles of bank of up to 30 degrees.
Introduce the 20 degree per 2 second visual scan technique. The lookout starts at the tail – by looking over the shoulder opposite to the direction of turn – and continues forward through the nose of the aeroplane in the direction of the turn, to finish looking at the tail again. Discuss the restrictions imposed on a good lookout by the airframe, and therefore the appropriate head movements required to minimise blind spots.
Developing the student’s situational awareness is very important. At this stage the lookout, and listen out, are particularly important.
Discuss situational awareness in relation to:
Introduce the VFR requirements within controlled airspace. You may like to provide them with a VFR Met minima card. You can order these by emailing publications@caa.govt.nz.
There are no new engine handling considerations for this exercise, so revise the use of smooth but positive throttle movements.
Revise why carburettor heat may need to be used.
Turns are practised through 360 degrees to minimise disorientation. Choose an easily identifiable reference point.
For some students, the sensations of the turn may be uncomfortable at first. They may also tend to lean out of the turn. Let them know that this is a natural human tendency, as the body tries to realign itself with the perceived vertical, and that it will stop with exposure and practice. Students may also feel a slight increase in their weight (G). This is the gyroscopic reaction to the increased lift.
The first exercise will be a demonstration of adverse yaw, emphasising the appropriate use of rudder.
Discuss entering, maintaining, and exiting the medium level turn, at a bank angle of 30 degrees.
The climbing turn is commonly demonstrated at 15 degrees angle of bank and the descending turn at 30 degrees angle of bank.
The markings on the artificial horizon should be explained – at least up to the 30-degree bank angle mark (see Figure 4).
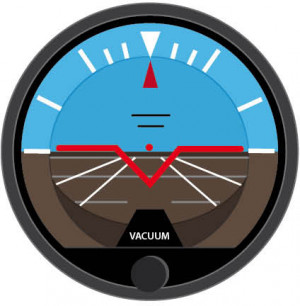
Figure 4 Artificial horizon instrument
With a reference altitude, prominent reference point chosen, and the heading noted, emphasise and complete a thorough lookout.
Once the lookout is complete, roll the aeroplane smoothly into the turn with aileron and apply sufficient rudder in the same direction to maintain balance. Increase backpressure on the control column as required to maintain the altitude. Emphasise that the increase in backpressure is very slight. For example, if the aeroplane was being flown with the finger and thumb in level flight, only one more finger would be required to maintain the turn.
To maintain a constant airspeed when entering both the climbing and descending turn, relax backpressure as required.
At 30 degrees angle of bank – which should be recognised by reference to the attitude and confirmed by instruments – a slight check of aileron will be required and rudder pressure reduced to maintain balance.
Maintaining the turn involves using the LAI scan.
L Lookout
In a scan, look out to the left (port) and scan (for a turn to the right) 20 degrees for 2 seconds from left to right, passing over the nose of the aeroplane. Emphasise looking into the turn.
A Attitude
Ensure the attitude for 30 degrees angle of bank and level flight is correct relative to the horizon and, more importantly, constant. When the outside scan is complete, scan inside.
I Instruments
Are scanned to confirm accurate flight (height – bank – ball).
Angle of bank is controlled with aileron – altitude with elevator.
During the turn, scan only those instruments relevant to the manoeuvre and do not trim the aeroplane.
Lookout into the turn for traffic and the upcoming reference point. Allow for inertia by anticipating the roll out so that the wings will be level when the reference point is reached. Common practice is to use half the bank angle as a guide, for example, in a 30 degree bank, start the roll out 15 degrees before the reference point. This helps establish a smooth roll out, making it easier to coordinate.
Approximately 15 degrees before the reference point is reached, start to smoothly roll wings level with aileron, balance with rudder in the same direction, and relax the backpressure to re-establish the level attitude and maintain a constant altitude. On exit from a climbing or descending turn, check PAT.
The student should be able to taxi by this point. Introduce the instrument check during the taxi, and continue (or begin) to involve the student in the checklists.
You may want to introduce some basic radio work. For example, have the student call ready for take-off, and respond to the clearance (if one is required).
The student should be able to perform the take-off following the previous lesson.
On the way out to the training area, revise the different climbing attitudes and their performance.
The student should be capable of climbing to a suitable altitude and levelling off. A short amount of straight and level practice can be done while you talk about adverse yaw. Since it is best to demonstrate adverse yaw at low speed, ask the student to slow the aeroplane down while maintaining straight and level. Take control and demonstrate adverse yaw. There is no need for the student to practise this.
Start with level 30 degree angle of bank turns.
Emphasise the lookout, before and during the turn, by moving your upper body to demonstrate that more than just head movement is required to overcome blind spots.
Rather than patter the entry as “roll in with aileron, balance with rudder”, it may be better to patter the actual control movements; for example, “roll in with right aileron, balance with right rudder.” You will be able to move to “balanced entry” and “balanced exit” as the student progresses.
Once the student has completed satisfactory medium level turns, both left and right from straight and level, ask the student to enter a climb or descent and demonstrate the attitudes for climbing turns and descending turns. Then the student should enter the climb/descent while turning.
Finish the lesson with the student consolidating what they have learned. Ask the student to climb/descend to an altitude and turn to roll out on a feature, so they can practise coordinating entering the climb/descent while turning and completing the climb/descent while levelling off. The student should complete the manoeuvres at a different altitude and heading from where they started.
On the way back from the training area, more practice at the different descents, and descending turns can be completed. The student may like to use the flap again to become a little more familiar with it.
The student may well be comfortable enough to fly the aeroplane in the circuit, under your direction. Discuss how you will be joining the circuit, and any radio call you need to make.
Depending on the CFI’s lesson sequence, the next lesson may be Slow flight, where the student will need to fly straight and level and turn at a slower speed than they have yet seen. Ask them what sort of attitude they would expect to see if they were flying slower than normal.
Encourage them to do some pre-reading before the next lesson.
Medium, climbing and descending turns whiteboard layout [PDF 732 KB]
Revised 2023